Apptoto provides a “Sync Agent” that can run on a Windows desktop and connect Apptoto to your Microsoft Exchange server for the purposes of syncing Calendars and Address Books.
To get started you will need:
- Your Exchange server’s Exchange Web Services URL (e.g. http://ourmail.ourcompany.com/EWS/Exchange.asmx )
- The username and password for an Exchange user that has access to the Calendars or Address Books that you want to sync
- The username and password for an Apptoto account. You can signup here if you haven’t already: https://www.apptoto.com/signup
The Apptoto Sync Agent should be installed on a machine that will be up and running often. Apptoto will only be able to sync data when this agent is up and running.
The Apptoto Sync Agent will sync once an hour automatically once fully configured. You can trigger an on-demand sync as outlined in Step 7.
Step 1) Download and Run the installer
Please email support@apptoto.com for instructions on downloading the setup.exe file.
Download and run that installer and let it complete.
Step 2) Run Apptoto > Apptoto Sync Agent from the Windows Start menu.
If the shortcut doesn’t appear in the Windows Start menu, then run “C:\Program Files (x86)\Apptoto\ApptotoAgent\ApptotoTray.exe” directly.
Step 3) Log into Apptoto
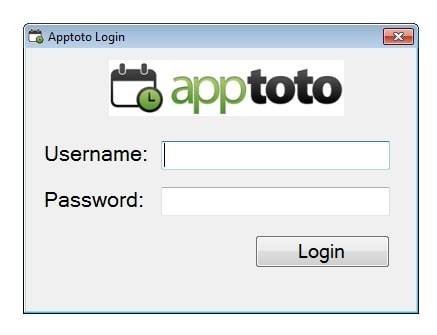
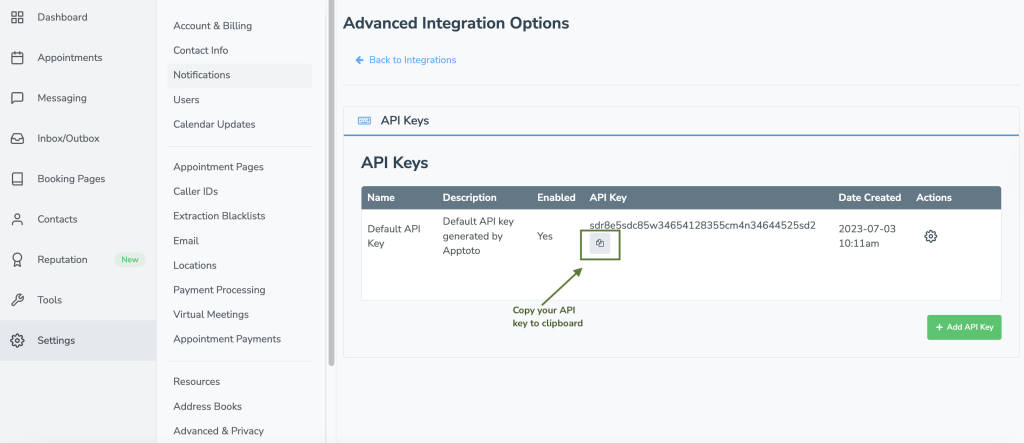
Best option is to use your “API Key” in place of the password here. The API Key is located on the “Settings” > “Integrations” tab and the “API Keys” section. This enables Apptoto to stay connected even if you update your Apptoto password leading to a more stable connection to sync the data.
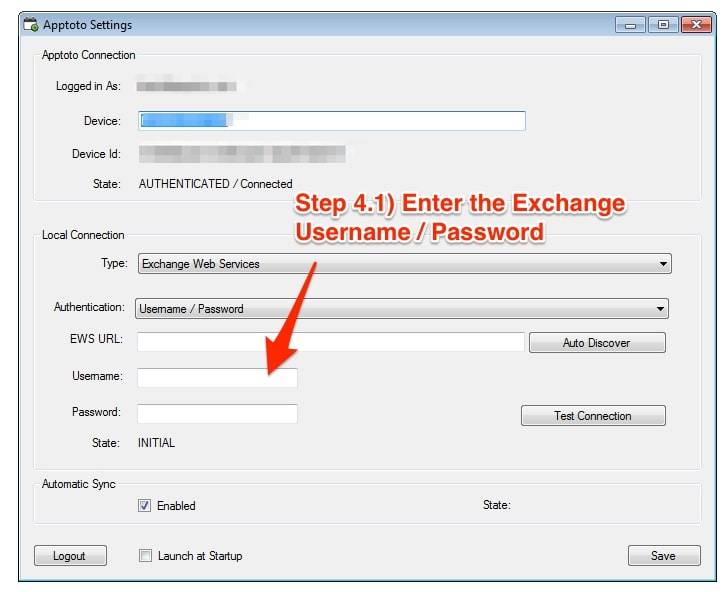
Step 4) Configure your Exchange Connection
Now enter in your username and password for the Exchange user that has access to the calendars and address books that you want to sync with Apptoto.
Note: No data will be synced after this step is complete. You will be able to pick which calendars you want synced in Step 6 below.
Then, enter your EWS URL, or click “Auto Discover” if you think your organization is set up with auto-discovery.
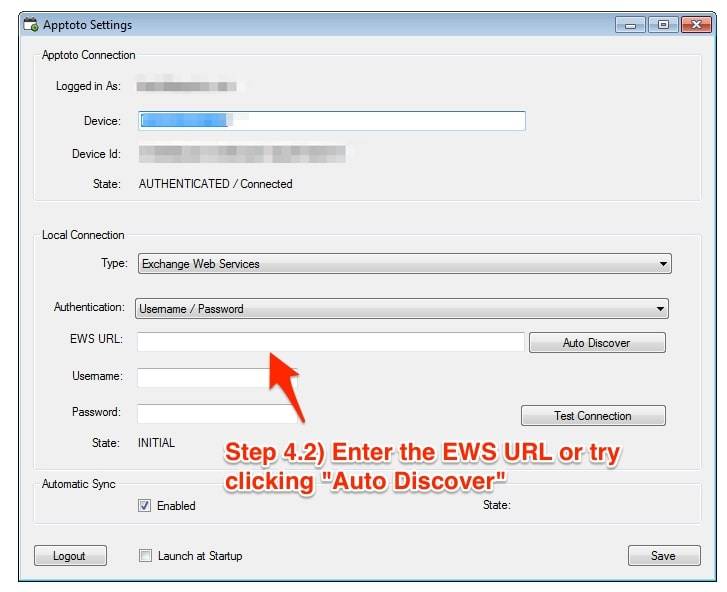
The EWS URL is usually in the form: https://server/EWS/Exchange.asmx . Replace “server” with the DNS name of your Exchange server, which can typically be found by inspecting the “Mailbox” setup in “Control Panel” > “Mail” on a Windows machine whose Outlook is configured to connect to exchange. If that doesn’t help, then often times the EWS URL will have the same “server” as your Outlook Web Access (i.e. OWA) url.
Step 5) Test Connection and Save
Now, click “Test Connection”. If is succeeds then click “Save”.
You might also want to check the “Launch at Startup” checkbox to make sure that the Apptoto Sync Agent is always running, even after a restart.
Step 6) Add Calendars and Address Books through the Apptoto website
Now that the Apptoto Sync Agent is configured and running, you can add Exchange Calendar and Exchange Address Books to your Apptoto account by
- Navigate to https://www.apptoto.com/portal
- Click on “Settings” > “Calendars”
- Click “Add Calendar”
Then choose “Exchange” as the type of calendar that you would like to connect. Make sure the correct “Device” is chosen and wait for the Calendar dropdown box to load:
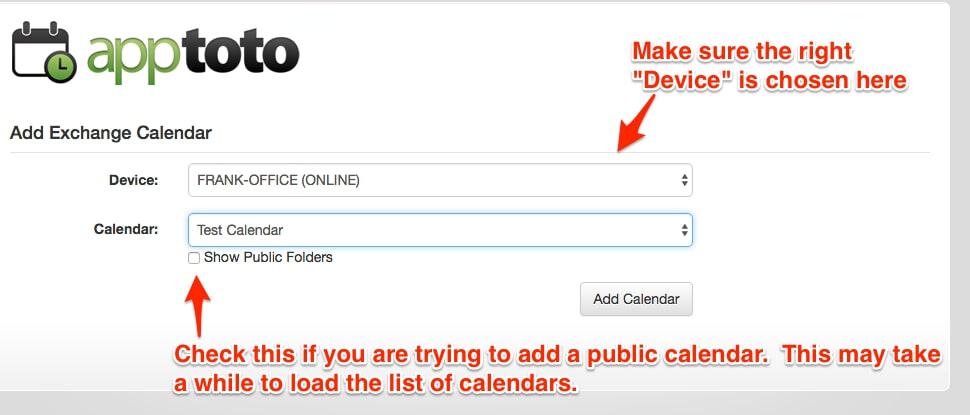
If you are trying to add a “Public Calendar” then check the “Show Public Folders” checkbox. This can take a while to load.
If you are trying to add a “Shared Calendar”, then choose ““ and enter in the email address of the person that owns that calendar.

Step 7) Check sync status
Once an Exchange Calendar is connected… you can check it’s sync status on the Apptoto website on the “Settings” > “Calendars” tab.

Click the “Sync” button to trigger a on-demand sync.
Running more than one Apptoto Sync Agent on the same machine
This is useful if you want to sync different calendars with different Apptoto accounts. To do this follow these steps
- Create a shortcut to the “c:\program files (x86)\Apptoto\ApptotoAgent\ApptotoTray.exe” executable.
- Set the command line arguments for that shortcut to “—profile “ . replace with something like “second” or the 2nd Apptoto’s username.
- Start the Apptoto sync agent using that shortcut and log into the second Apptoto user.
You can create as many shortcuts with different profile names as you like.
Running Apptoto Sync Agent as a Windows Service
If you prefer to run the sync agent as a Windows Service (which is nice because then the user does not have to be logged into Windows for Apptoto to be connected) then follow these steps AFTER you’ve set it up.
If you are running version 2.0.17 of the Apptoto Sync Agent, then you don’t have to do these steps. Instead just check the “Run as Windows Service” checkbox in the Settings screen and click “Save”.
- Close the Apptoto Sync Agent in the Windows System Tray
- Open a command line prompt, cd to c:\Program Files (x86)\Apptoto\ApptotoAgent
- Run “ApptotoService.exe -install”
- Click “Yes” when it asks if you want to copy the info over.
- Open “Services” management console and set the Apptoto Sync Agent Service to start “Automatically (Delayed Start)”
- Manually start the Apptoto Sync Agent Service the first time.
If you need to update the settings, then run the Apptoto Sync Agent tray application again, save the settings, and then follow the steps above to copy the settings over to the correct profile.
Updating your Exchange Username and Password
You may be able to skip the steps below if the “Run as Windows Service” checkbox is not greyed out for you. In that case, you can just check it and click “Save”.
If your Exchange username and/or password changes, you’ll need to update the Apptoto Sync Agent with the new values. To do so, follow these steps:
- Click on the Apptoto icon in the System Tray (bottom right of your Windows Desktop) to bring up the Apptoto Sync Agent settings dialog. If you don’t see it in the System Tray then run the “Apptoto Sync Agent” from the Windows Start Menu.
- Enter the new username and password (in the fields pointed to by step 4.1 above)
- Click Save
- IMPORTANT: If you’re running the Sync Agent as a Windows Service then do these steps:
- Open a command line prompt, cd to c:\Program Files (x86)\Apptoto\ApptotoAgent
- Run “ApptotoService.exe -install”
- Click “Yes” when it asks if you want to copy the info over.
- Open “Services” management console and set the Apptoto Sync Agent Service to start “Automatically (Delayed Start)”
Troubleshooting
The Sync Agent won’t let you log into Apptoto
Please check that you do not have a firewall configured to prevent outbound connections from the Apptoto Sync Agent process.
Apptoto won’t connect to Exchange
- Make sure that the EWS url is correct. Try opening the EWS url in a browser and logging in with your username/password. If that does work then proceed to the next step
- The log file is located at %APPDATA%/Local/Apptoto/log.txt . If you are having trouble, please send us that log file, or take a look inside of it for hints as to why the “Test Connection” step is failing.