
Move a Public Folder Calendar to a Shared Mailbox
This is the short version, for one calendar and a small team. Almost everything happens in Outlook and the Microsoft 365 admin center. One step needs PowerShell, and it is clearly marked.
What you will need
Section titled “What you will need”- Classic Outlook for Windows. New Outlook and Outlook for Mac cannot export to a
.pstfile, so neither can do this job. - Administrator access to the Microsoft 365 admin center.
- A quiet window. Ask your team to stop adding appointments to the calendar until you tell them it has moved.
Step 1. Find the calendar and count what is in it
Section titled “Step 1. Find the calendar and count what is in it”-
In classic Outlook, open the Folders view. Click “More Apps” on the navigation bar and select “Folders.” Expand “Public Folders” > “All Public Folders” and find your calendar.
-
If it is not there, it is not a public folder calendar, and you do not need this article. Connect it in Apptoto with “Add Calendar By Email” instead.
-
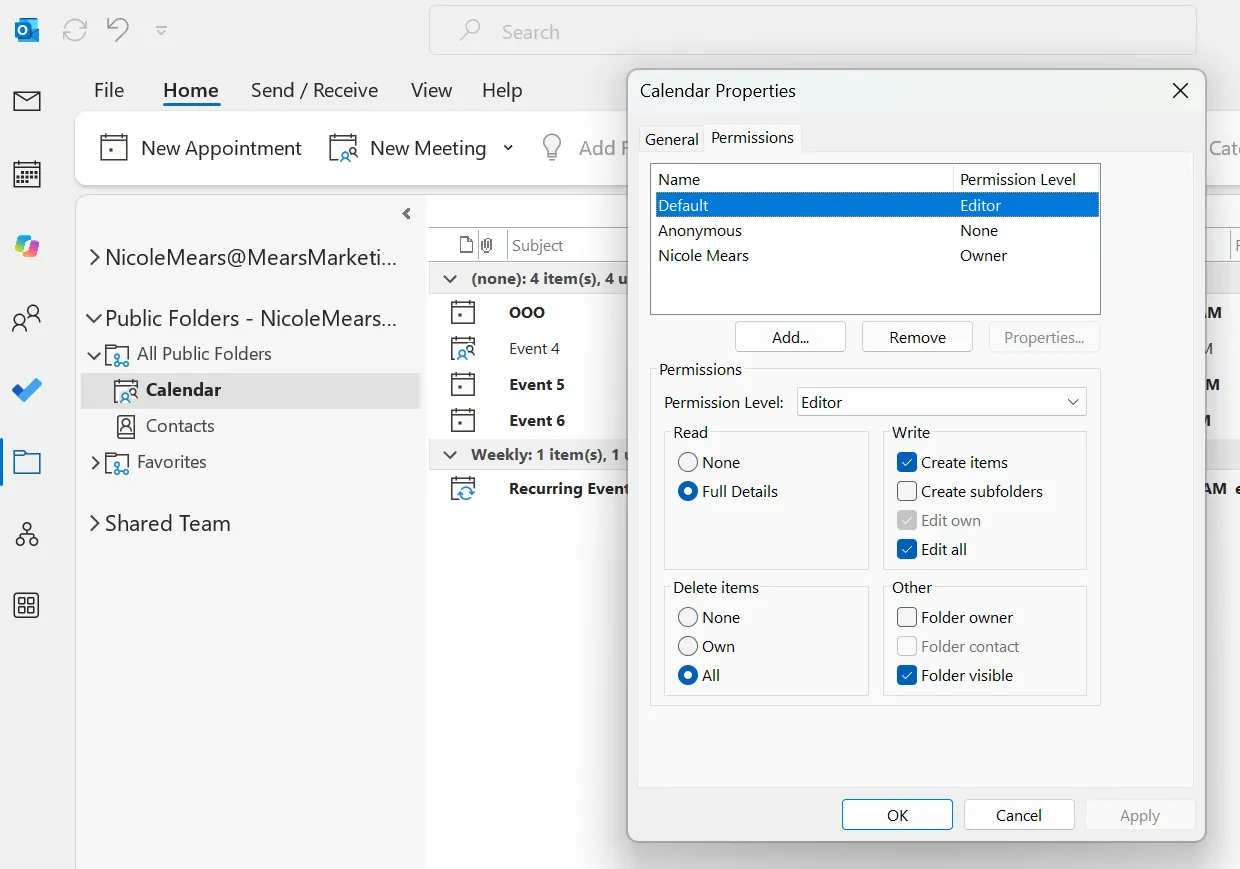
Right-click the folder, select “Properties,” and open the “Permissions” tab. Take a screenshot of this tab before changing anything, so you have a record of who had access.
-
Add your own account and set the permission level to Owner.
-
Now count the appointments. With the folder selected, go to the View tab and choose Change View > “List.” The status bar at the bottom of the window shows the total, such as “Items: 1,284.” If no count appears, right-click the status bar and tick “Items in View.” Write the number down.
A recurring appointment counts as one item in List view, regardless of how many times it occurs. That is fine, as long as you count the new calendar the same way in Step 7.
Step 2. Create the shared mailbox
Section titled “Step 2. Create the shared mailbox”-
In the Microsoft 365 admin center, go to Teams & groups > Shared mailboxes and click ”+ Add a shared mailbox.” Give it a name and address your team will recognize, such as
teamcalendar@yourcompany.com. -
Leave it unlicensed. A shared mailbox holds up to 50 GB without a license, far more than a calendar needs.
-
Leave it visible in the address list. Hiding a shared mailbox causes access problems that are hard to diagnose later.
-
Under “Manage Mailbox Permissions,” give your own account “Read and manage” permission on the new mailbox. This is the setting the Exchange admin center calls Full Access, and it is what makes the mailbox appear in your Outlook. Adding yourself under “Members” is not the same thing and will not do it.
-
Write down the email address. You will need it in Step 8.
Outlook adds the mailbox to your folder list automatically, but permission changes can take up to 60 minutes to take effect, and the mailbox only appears after you close and reopen Outlook. Do this step now so it is ready when you need it.
Setting the time zone (PowerShell required)
Section titled “Setting the time zone (PowerShell required)”A new shared mailbox has no time zone, because nobody signs in to it. Microsoft provides no way to set it in any admin screen. Open the Start menu on your Windows PC, search for “Windows PowerShell,” open it, and run the following three commands in the order shown.
IMPORTANT: Change the email addresses (admin and shared team) and the time zone in the command to match yours.
Install-Module ExchangeOnlineManagement -Scope CurrentUser
Connect-ExchangeOnline -UserPrincipalName admin@yourcompany.com
Set-MailboxRegionalConfiguration -Identity "teamcalendar@yourcompany.com" -TimeZone "Pacific Standard Time" -Language en-US
The first line installs Microsoft’s module and only needs to be run once. Answer yes if it asks about an untrusted repository or a missing NuGet provider. The second signs you in and opens a browser window. The third sets the time zone.
Step 3. Download the calendar in Outlook
Section titled “Step 3. Download the calendar in Outlook”Outlook exports its local copy of a folder, not the version on the server. If the folder was never downloaded, your export will be empty, and Outlook will not warn you. Adding the folder to Favorites is what triggers the download.
-
Right-click the calendar under “All Public Folders” and select “Add to Favorites…” Leave the name unchanged.
-
Go to File > Account Settings > Account Settings, select your account on the “Email” tab, and click “Change.”
-
Click “More Settings,” open the “Advanced” tab, and tick “Download Public Folder Favorites.” If it is greyed out, tick “Use Cached Exchange Mode” first.
-
Restart Outlook and wait until the status bar reads “All folders are up to date.”
-
Check that the download has finished. Under “Public Folder Favorites,” right-click your calendar, select “Properties,” and open the “Synchronization” tab. “Server folder contains” and “Offline folder contains” should show the same number. If the offline number is lower, the download is still running. Wait and check again.
If Favorites appears empty but the Synchronization tab shows matching counts, the download worked, and you can continue.
Step 4. Export the calendar to a file
Section titled “Step 4. Export the calendar to a file”-
Go to File > Open & Export > “Import/Export.”
-
Select “Export to a file,” then “Outlook Data File (.pst).”
-
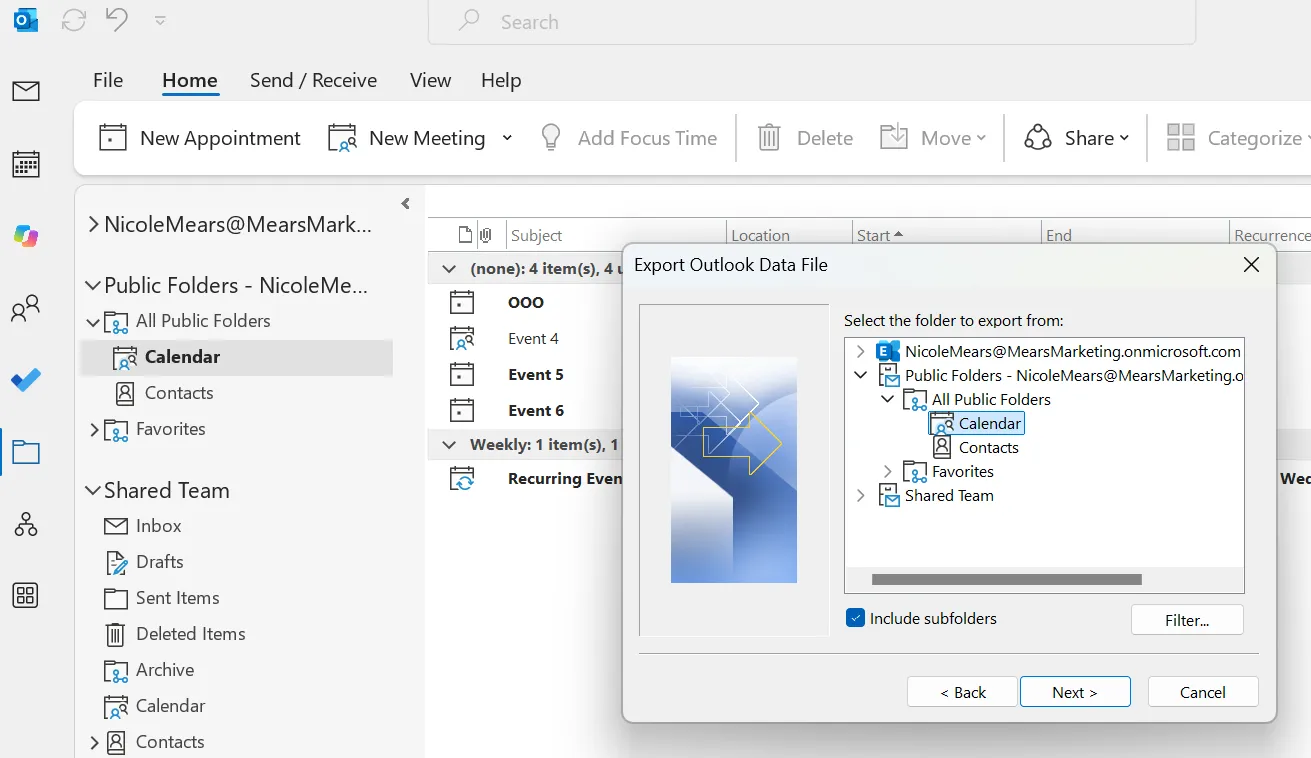
Expand “Public Folders” > “All Public Folders” and select your calendar. Export from here, not from the “Favorites” node.
-
Click “Browse,” choose a location and file name, click “OK,” then “Finish.” Leave the password blank.
-
Check the file is not empty. Go to File > Open & Export > “Open Outlook Data File,” open what you just made, select the calendar inside it, and use View > Change View > “List” to read the count in the status bar. It should match the number from Step 1. Do not continue until it does.
-
Copy the file somewhere safe. It is your only backup.
Step 5. Make the old calendar read-only
Section titled “Step 5. Make the old calendar read-only”Do this as soon as the export finishes. Your file is a snapshot, so anything added to the public folder after this point will be lost when you retire it.
-
Right-click the calendar under “All Public Folders,” select “Properties,” and open the “Permissions” tab.
-
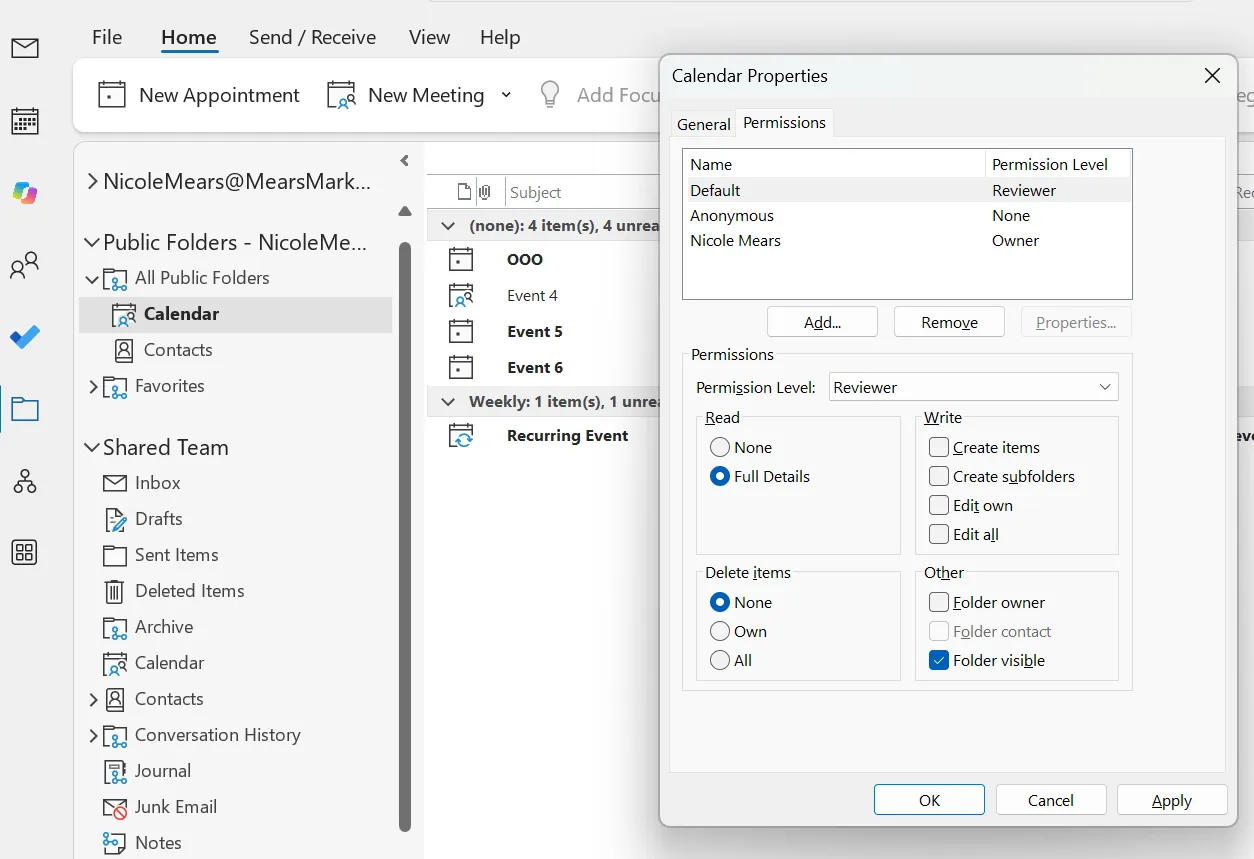
Select “Default” and change the permission level to Reviewer. That leaves everyone able to read it and nobody able to add to it.
-
Check the “Anonymous” entry too. If it is set to a value above None, lower it; otherwise, the folder is not really locked.
-
Do the same for anyone listed individually with a higher level. Leave your own account as Owner, because you still need it in Step 8.
Do not rename or delete the folder yet. That comes at the end, once the new calendar is working.
Step 6. Import the calendar into the shared mailbox
Section titled “Step 6. Import the calendar into the shared mailbox”-
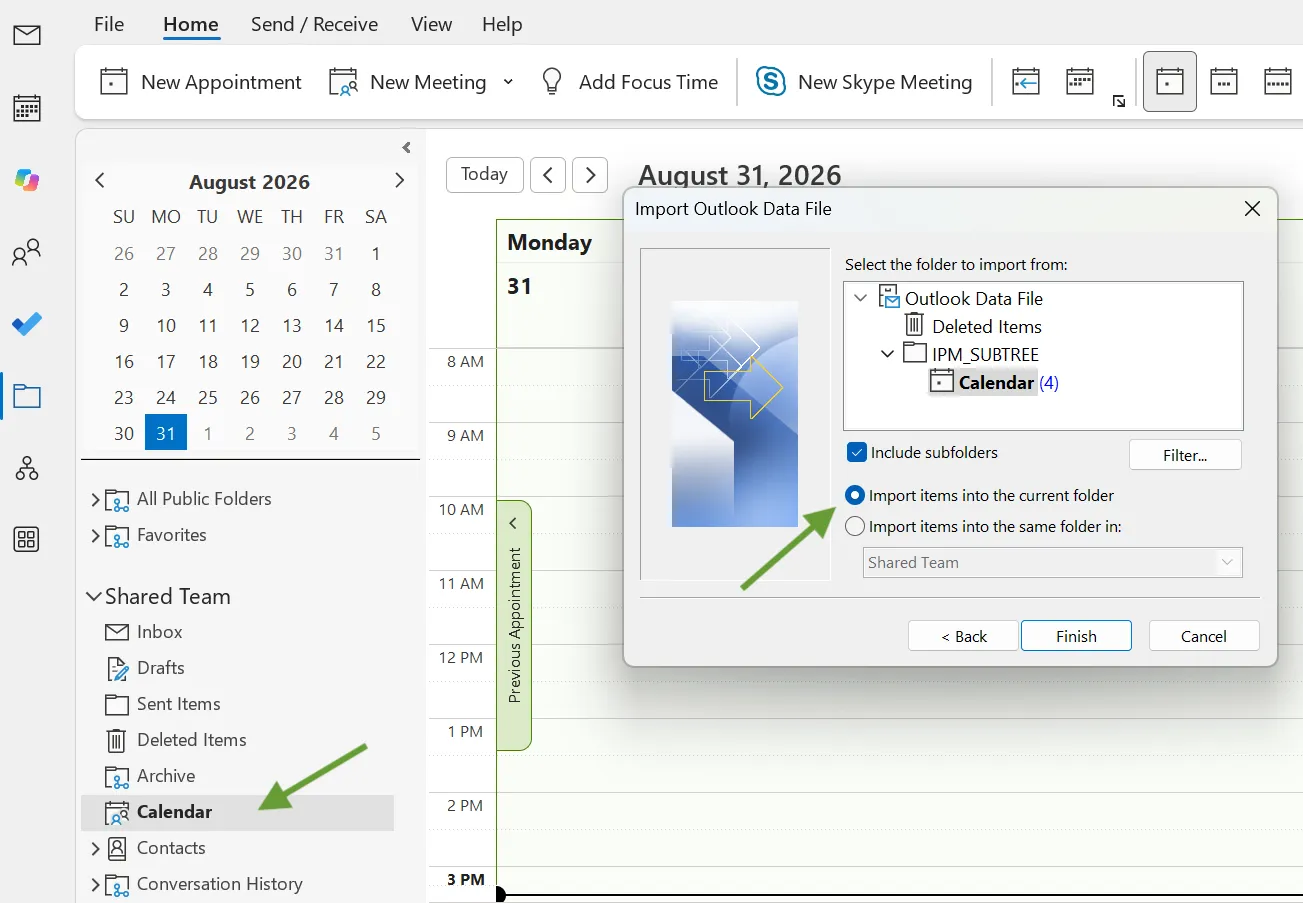
In the Folders view, find the shared mailbox in your folder list and single-click its “Calendar” folder, so it is the folder you are currently in. If the mailbox is not there yet, restart Outlook.
-
Go to File > Open & Export > “Import/Export.”
-
Select “Import from another program or file,” then “Outlook Data File (.pst).”
-
Browse to your file and select “Allow duplicates to be created.”
-
Expand the file fully and select the calendar folder inside it. It carries the public folder’s name, for example “Team Calendar,” not “Calendar.”
-
Select “Import items into the current folder.” This is the option that matters. It sends everything into the shared mailbox calendar you selected at the start of this step.
-
Click “Finish” and let it run without switching folders.
Step 7. Check it, then give your team access
Section titled “Step 7. Check it, then give your team access”Wait until Outlook’s status bar reads “All folders are up to date,” then check three things.
-
The appointments are in the mailbox’s own Calendar. Look at the shared mailbox in your folder list. You should see one calendar named “Calendar” holding your appointments. If a second calendar appeared next to it, the import went to the wrong place. Delete the extra folder and repeat Step 6 with “Import items into the current folder” selected.
-
The count matches. Select the shared mailbox’s Calendar, then View > Change View > “List,” and read the status bar. Compare against the number from Step 1.
-
The details survived. Open an all-day event and confirm it is still all-day on the same date. Open a repeating appointment and confirm it opens as a series, not as separate entries.
Once that checks out, grant access. From the Folders view, right-click the Calendar folder and choose “Properties.” On the “Permissions” tab, click “Add,” choose each person, and set their level. Don’t forget to reset the Default permission level. Editor lets them add and change appointments, which matches what most people had before. Reviewer is read-only.
Then tell your team. Give them the shared mailbox address, say the old public folder is now read-only for good, and ask them to remove it from their Outlook Favorites today. A leftover favorite is the usual reason someone keeps looking at the wrong calendar a month later.
Step 8. Connect it in Apptoto, then retire the old folder
Section titled “Step 8. Connect it in Apptoto, then retire the old folder”-
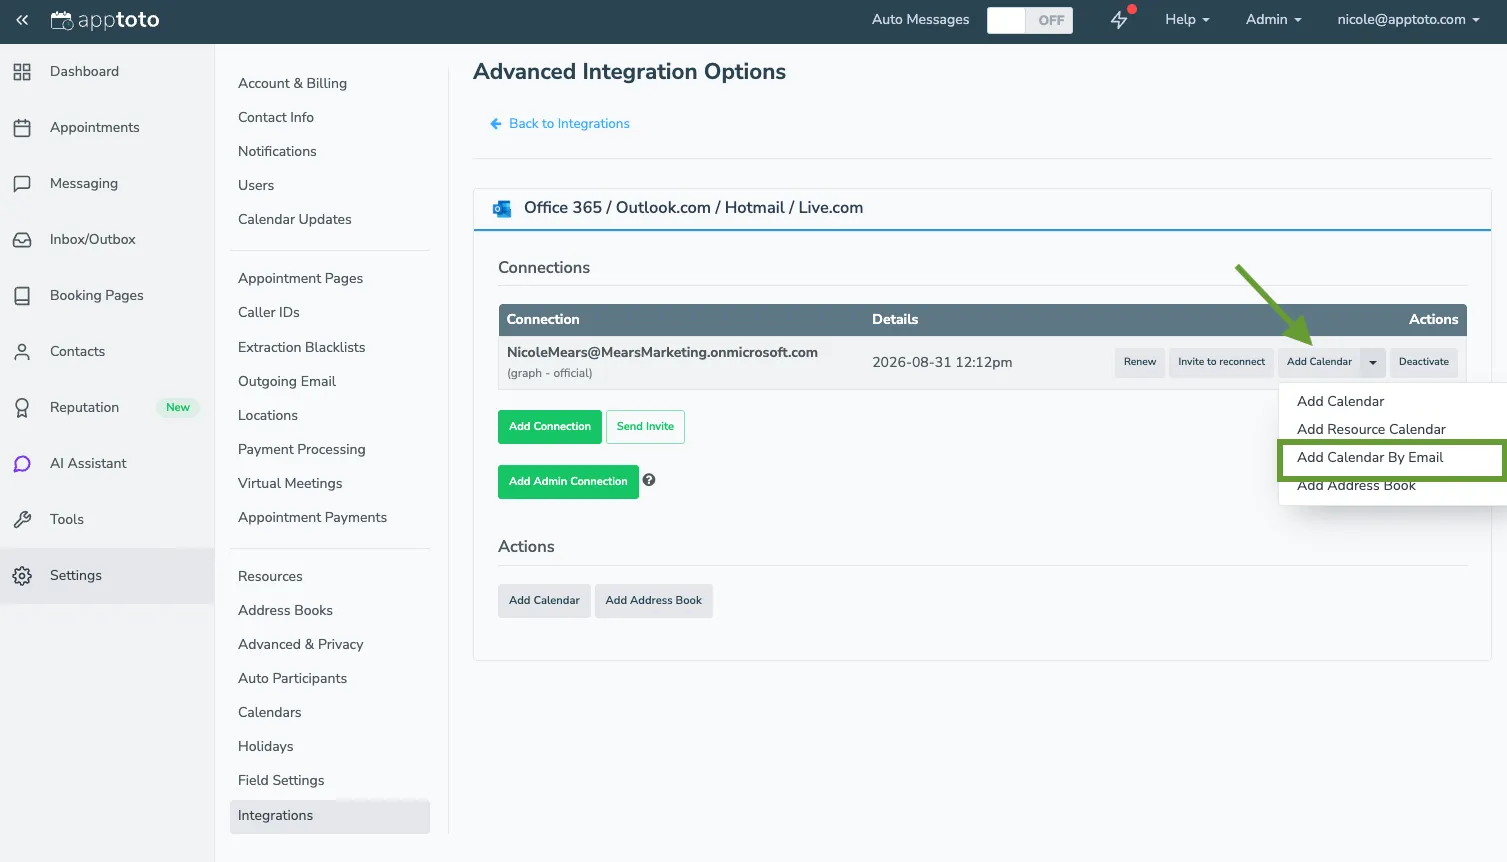
Open Settings > Integrations and find the “Office 365 / Outlook.com / Hotmail / Live.com” section. Click “Add Connection,” or “Add Admin Connection” to cover your whole organization at once.
-
Click the arrow next to “Add Calendar” and select “Add Calendar By Email.” Enter the shared mailbox address from Step 2 and save.
-
Open Settings > Calendars. You should see the shared calendar listed and enabled. Confirm that your appointments are also listed on the “Appointments” tab.
-
Only once that is working, remove the old public folder calendar from Settings > Calendars, so appointments do not appear twice.
-
In Outlook, rename the old public folder to something obvious, such as “Team Calendar - ARCHIVED - moved to teamcalendar@yourcompany.com.”
-
Leave it read-only and renamed for 30 to 60 days. If nobody misses anything, delete it. Keep the exported file as a backup.
If something goes wrong
Section titled “If something goes wrong”The exported file is empty or missing older appointments
Section titled “The exported file is empty or missing older appointments”The folder was not fully downloaded. Go back to Step 3, confirm “Download Public Folder Favorites” is ticked, and check the Synchronization tab counts match before exporting again. Also make sure you exported from the folder under “All Public Folders,” not from the “Favorites” node.
Outlook says “Copying meetings is not supported”
Section titled “Outlook says “Copying meetings is not supported””Newer versions of Outlook may refuse to copy calendar items that have attendees. Plain appointments still move, which means a partial move can look like it worked. Contact Apptoto Support rather than working around it, because meetings involve organizer and attendee information that does not transfer cleanly to a shared mailbox.
Apptoto connects but shows no appointments
Section titled “Apptoto connects but shows no appointments”The import created a separate calendar folder instead of merging into the mailbox’s own Calendar. Look at the shared mailbox in Outlook’s folder list. If there are two calendars, delete the extra one and repeat Step 6.
Appointment times are wrong
Section titled “Appointment times are wrong”The shared mailbox probably doesn’t have a time zone. Run the PowerShell command in Step 2, delete the imported appointments, and import the file again.
The shared mailbox never appears in Outlook
Section titled “The shared mailbox never appears in Outlook”Permission changes take up to 60 minutes to take effect, and the mailbox only appears after you close and reopen Outlook. Confirm you granted yourself “Read and manage,” not just membership.
Need a hand?
Section titled “Need a hand?”If your counts do not match, if you hit the meetings error, or if anything else stops you, contact us before you delete anything. The public folder still holds every appointment until you remove it, so nothing is lost while you are stuck.
For larger or more complex migrations, contact Apptoto Support for the comprehensive migration guide.