
Shared, Resource, and Room Calendars
If you are an IT admin setting Apptoto up for a team, this is the page for you. Most shared calendars in Microsoft 365 can be connected directly from Settings > Integrations in a couple of minutes.
What kind of calendar do you have?
Section titled “What kind of calendar do you have?”Microsoft uses several similar-sounding names for calendars that are not your own. Which one you have decides how you connect it.
| What you have | Where you see it in Outlook | Can Apptoto sync it? |
|---|---|---|
Shared mailbox (e.g. frontdesk@yourcompany.com) | As a second mailbox in the folder list, or under Shared Calendars | Yes |
Room or equipment mailbox (e.g. conference-room-a@yourcompany.com) | Under Rooms when you book a meeting | Yes |
| Another person’s calendar shared with you | Under Shared Calendars or People’s Calendars | Yes |
| Microsoft 365 Group calendar | Under Groups | Yes |
| Public folder calendar | At the bottom of the folder list, under Public Folders | No. See Public folder calendars below |
The quick test: if the calendar has its own email address, Apptoto can connect it with the steps below. If it lives under Public Folders, it does not have an email address and needs a different approach.
Two ways to connect a shared calendar
Section titled “Two ways to connect a shared calendar”Pick whichever fits your situation:
- Add an admin connection. One approval from a Microsoft 365 administrator gives Apptoto access to calendars across your whole organization. Best when you are connecting several shared mailboxes, rooms, or team calendars, and when you do not want to depend on one employee’s account staying active.
- Use a connection you already have. If someone has already connected their own Microsoft account to Apptoto, and that person has permission to see the shared calendar in Outlook, you can add the shared calendar to their existing connection. Fastest for a one-off.
Either way, the last step is the same: you add each calendar by typing its email address.
Option 1: Add an admin connection
Section titled “Option 1: Add an admin connection”-
Sign in to Apptoto as a Microsoft 365 administrator, or have your administrator standing by. Go to Settings > Integrations and open the Microsoft 365 / Outlook.com section.
-
Click Add Admin Connection. Your administrator signs in with their Microsoft account and reviews the permissions Apptoto is asking for. This grants Apptoto access to calendars across your organization.
If you are not signed in as an administrator, send this link to whoever is:
https://secure.apptoto.com/office365/start_microsoft_graph?admin_consent=true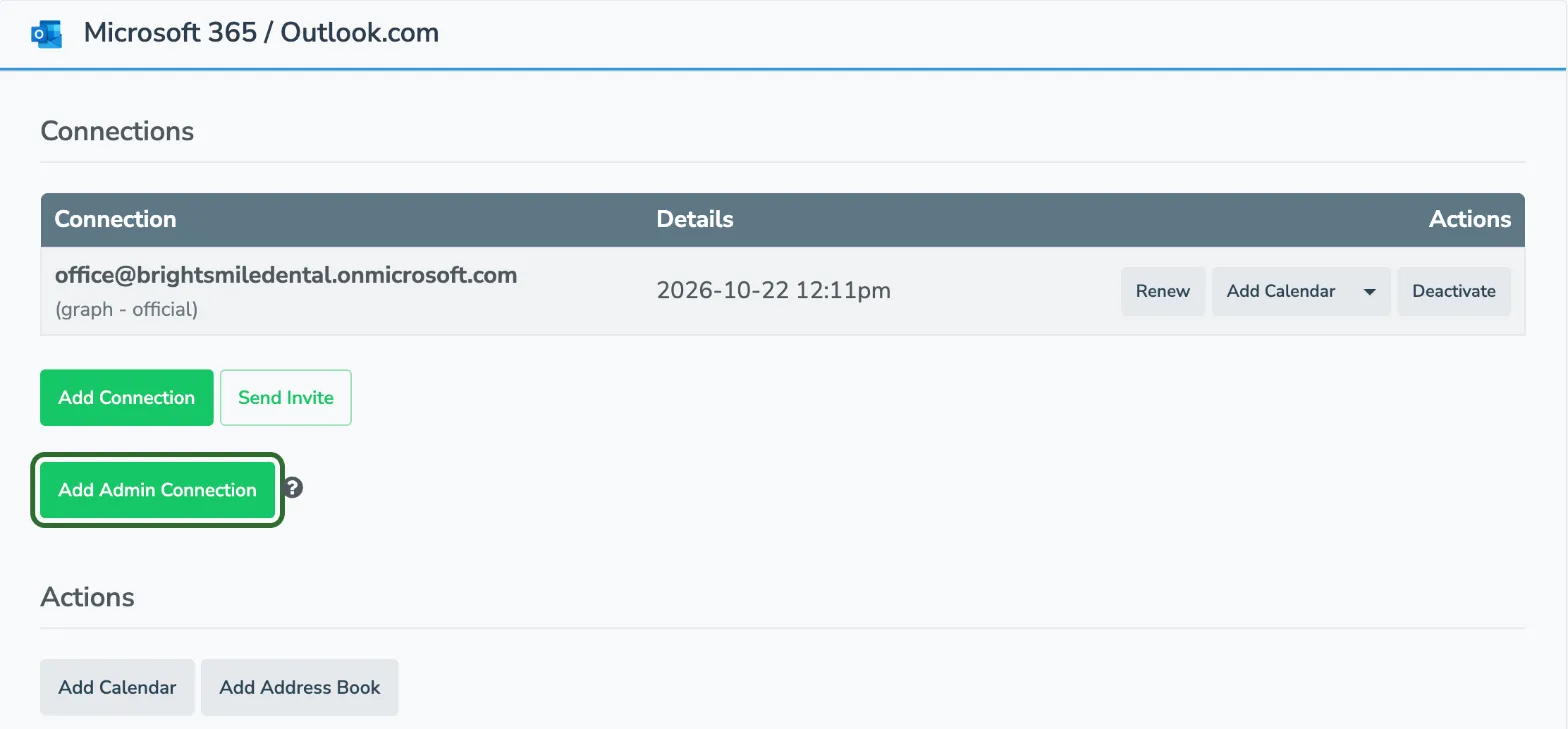
-
Give it up to a day. Microsoft can take up to 24 hours to activate admin consent. If the next step cannot find a calendar right away, wait and try again before troubleshooting.
-
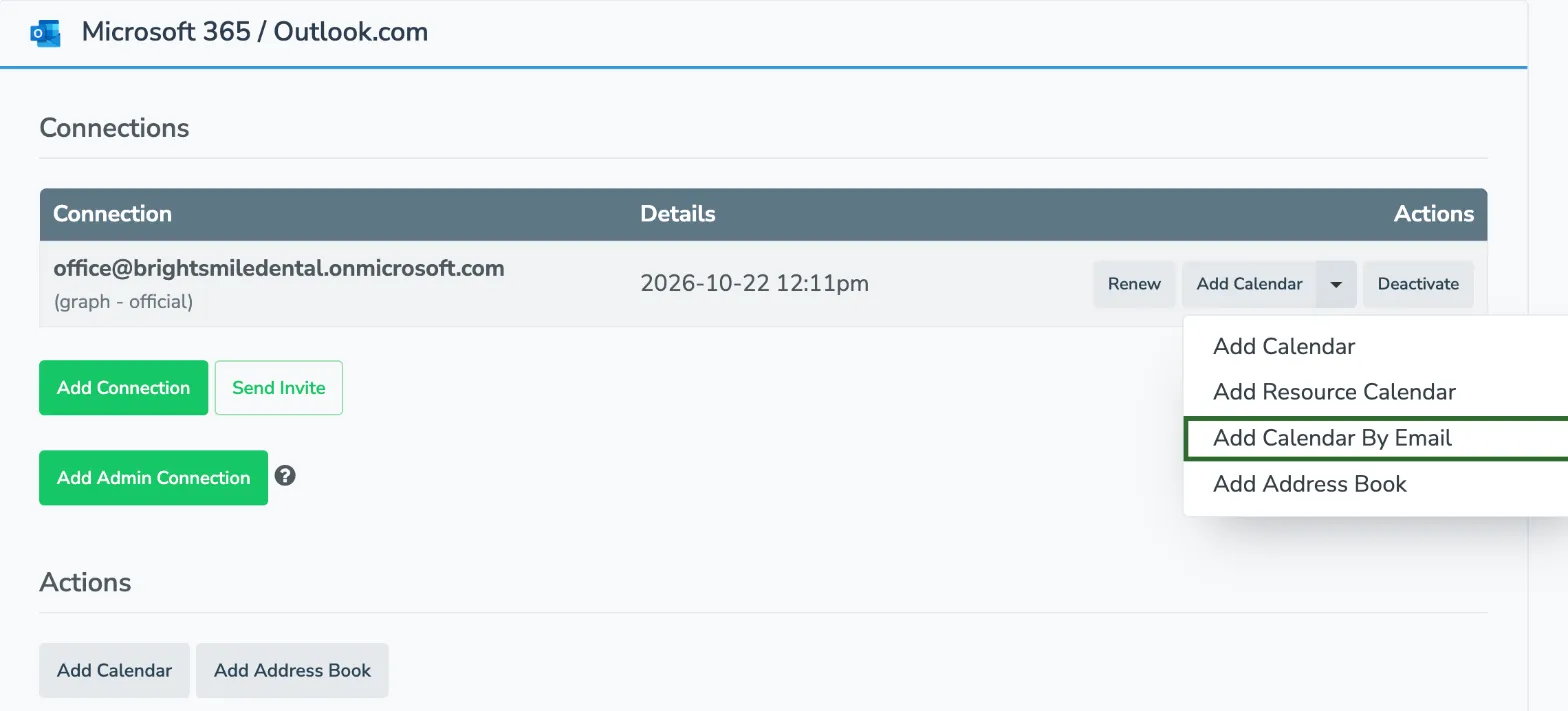
Add each calendar by email. Back on Settings > Integrations, find the new connection in the Connections list. Click the arrow next to Add Calendar and choose Add Calendar By Email.
-
Type the mailbox email address for the calendar you want (for example
frontdesk@yourcompany.comorconference-room-a@yourcompany.com) and click Next.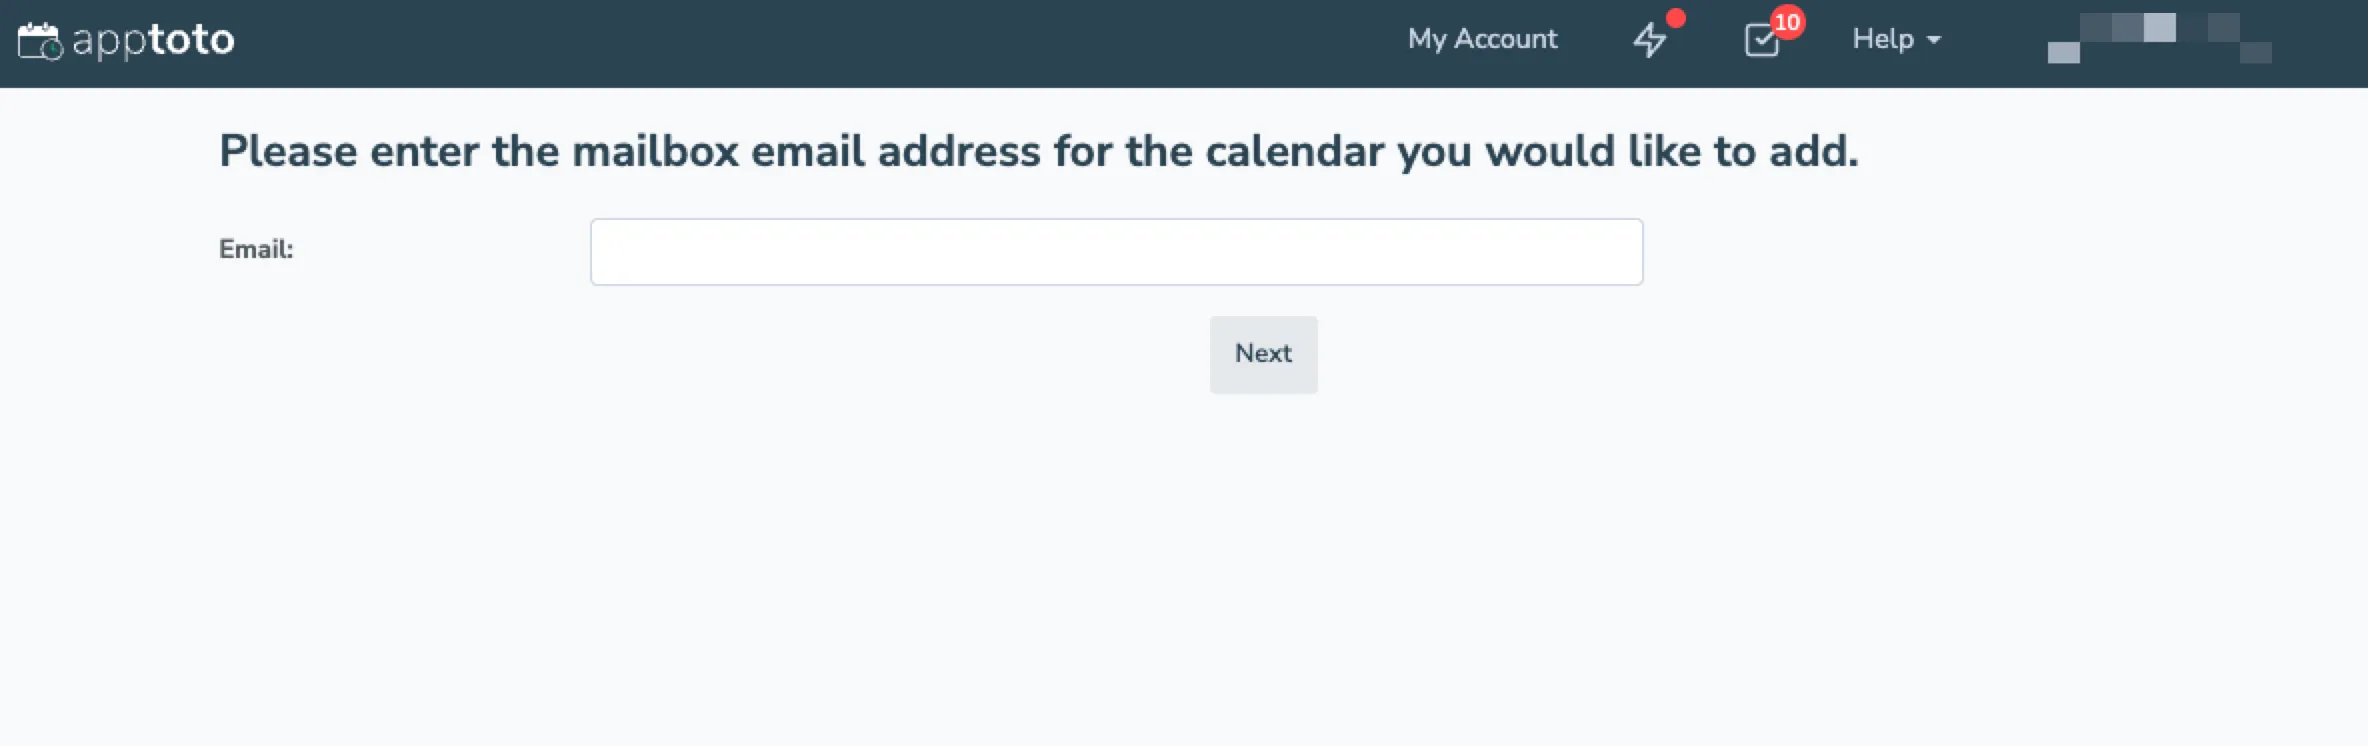
-
Pick the calendar and finish setup. Choose the calendar from the dropdown, give it a name and color for use inside Apptoto, set availability options if you plan to use online booking, then click Add Calendar.
-
Repeat for each calendar. An admin connection does not pull in every calendar automatically. You add them one at a time, so Apptoto only syncs the calendars you actually want.
Option 2: Add to an existing connection
Section titled “Option 2: Add to an existing connection”Use this when the person who connected their Microsoft account can already open the shared calendar in Outlook.
-
Go to Settings > Integrations and open the Microsoft 365 / Outlook.com section.
-
In the Connections list, find the connection signed in as the person who has access to the shared calendar.
-
Click the arrow next to Add Calendar and choose Add Calendar By Email. (Add Resource Calendar takes you to the same place, and is just a friendlier name when the mailbox is a room or a piece of equipment.)
-
Enter the mailbox email address, click Next, then pick the calendar and finish setup.
Best practices for IT admins
Section titled “Best practices for IT admins”- Use an admin connection for anything the business depends on. A calendar added through one employee’s personal connection stops syncing when that employee leaves and their account is disabled. An admin connection does not.
- Add only the calendars you need. Admin consent gives Apptoto the ability to reach calendars in your tenant, but Apptoto reads only the ones you explicitly add. Keeping the list tight keeps your Apptoto account tidy and your appointment volume predictable.
- Give shared calendars clear names in Apptoto. The calendar name and color are labels used inside Apptoto only, so name them the way your team talks about them (“Front Desk”, “Exam Room 2”) rather than repeating the raw email address.
- Rooms and equipment work well as booking resources. Once a room mailbox is connected, you can attach it to a booking page as a resource so Apptoto checks the room’s availability before confirming a booking. See Resources.
- Reconnect, don’t re-add. If a connection stops working, use Renew on that connection rather than deleting it and starting over. Re-adding creates new calendars and can duplicate your appointments.
Public folder calendars
Section titled “Public folder calendars”Calendars stored in Public Folders are the one case Apptoto cannot reach through a Microsoft 365 connection. They do not have their own email address, so there is no address to type into Add Calendar By Email.
Today, the only way Apptoto can read a public folder calendar is through the Apptoto Sync Agent, which uses Exchange Web Services. Microsoft is retiring Exchange Web Services in Microsoft 365, and has said it will not offer a replacement way for applications to read public folders.
If you have appointments in a public folder calendar, plan to move them. The usual replacement is a shared mailbox or a Microsoft 365 Group, both of which have an email address and both of which Apptoto connects using the steps above. Your Microsoft 365 administrator can create one and move the calendar contents across.
What about contacts?
Section titled “What about contacts?”Apptoto syncs contacts from the account a connection is signed in as. Choose Add Address Book on that connection and pick the contact folder you want.
There is no equivalent of Add Calendar By Email for contacts, so to sync a shared contact list, connect Apptoto with an account that has that contact folder in its own mailbox. If you need contacts from a shared mailbox, contact Apptoto Support and we will help you find the best setup.
Troubleshooting
Section titled “Troubleshooting”Apptoto can’t fetch the calendar list for that email address
Two common causes. First, the account you are adding from does not have permission to that mailbox. Give it Full Access to the shared mailbox in Microsoft 365, or have the owner share the calendar in Outlook, then try again. Second, if you just clicked Add Admin Connection, Microsoft may not have activated the consent yet. It can take up to a day. Wait and retry before changing anything else.
I don’t see Add Calendar By Email in the menu
Click the small arrow next to the Add Calendar button on the connection itself, not the Add Calendar button in the Actions section below it. The by-email option lives in that dropdown, along with Add Resource Calendar and Add Address Book.
The shared calendar synced, but appointments are missing
Apptoto syncs upcoming appointments once per hour. Click Sync on the Appointments tab or under Settings > Calendars to pull changes in immediately. If appointments are still missing, confirm you picked the right calendar from the dropdown during setup, since a shared mailbox can contain more than one calendar.
Our IT team blocked the admin consent request
See Outlook / Microsoft 365 Sync Troubleshooting for the Microsoft Entra settings your administrator needs, along with screenshots of the approval screens.
Once your shared calendars are connected, head to Message Setup to decide what Apptoto sends and when.