
Outgoing Email
The Settings > Outgoing Email tab controls the From address on every email Apptoto sends to your clients. It has two main parts:
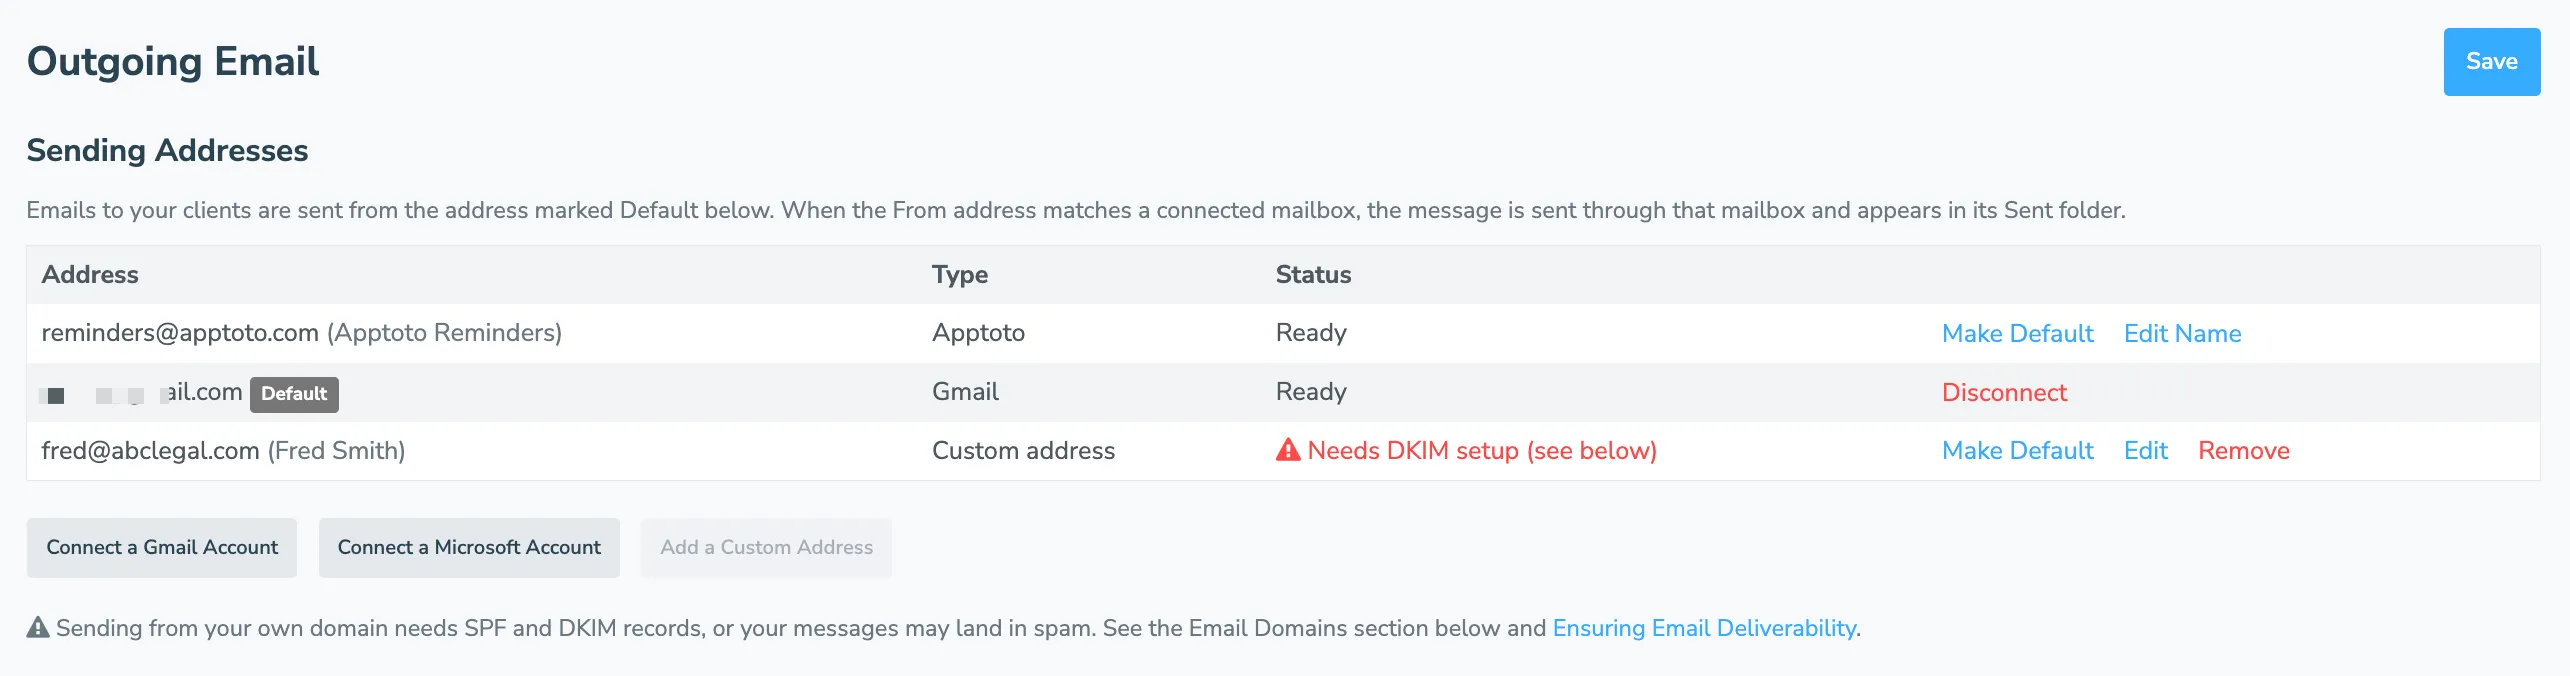
- A Sending Addresses table listing every address you can send from. One of them is marked Default, and that is the address your emails normally come from.
- A Calendar-Specific Sending setting that can override the From address per appointment, based on which calendar the appointment lives on.
Click Save after making changes on this tab.
Sending Addresses
Section titled “Sending Addresses”The table always includes Apptoto’s own address, reminders@apptoto.com. New accounts start with it as the Default, and it requires no setup at all. Click Edit Name to change the sender name shown next to it (it starts as “Apptoto Reminders”).
You can add two other kinds of addresses:
- Connected mailboxes: your own Gmail or Microsoft accounts. Messages sent from a connected mailbox go out through the account itself, so they appear in its Sent folder, and no DNS setup is needed.
- A custom address: any address you own, such as you@yourbusiness.com. Messages are sent by Apptoto on your behalf, which is why custom addresses on your own domain need the SPF and DKIM setup described in Ensuring Email Deliverability.
Whichever row is marked Default is used for your outgoing email. Click Make Default on a different row to switch.
Connect a Gmail or Microsoft mailbox
Section titled “Connect a Gmail or Microsoft mailbox”- On Settings > Outgoing Email, click Connect a Gmail Account or Connect a Microsoft Account.
- Sign in and approve the permissions Apptoto asks for. Be sure to allow sending mail, or the mailbox will connect but will not be able to send.
- The mailbox appears in the table. If it is your first one, it becomes your Default sending address automatically.
You can connect as many mailboxes as you need. That is useful when several people share one Apptoto account and each of them should be emailing their own clients from their own address (see Calendar-Specific Sending below).
Add a custom address
Section titled “Add a custom address”- Click Add a Custom Address. The form starts out filled in with your account’s email address and name.
- Enter the From Email Address your clients should see, and optionally a From Name. Leave the name blank to use the Name from your Settings > Contact Info tab.
- Click Done. The address is saved right away and appears in the table.
If the address is on your own domain, its status shows Needs DKIM setup (see below) until you verify the domain in the Email Domain Settings (DKIM) section at the bottom of the tab. See Ensuring Email Deliverability for a walkthrough.
What the statuses mean
Section titled “What the statuses mean”| Status | What it means |
|---|---|
| Ready | The address is ready to send. |
| Reconnect needed | Apptoto can no longer reach the mailbox. This usually happens after a password change, or if Apptoto’s access was removed in your Google or Microsoft account settings. Click Reconnect. |
| Cannot send mail | The mailbox is connected, but Apptoto was not given permission to send mail through it. Click Reconnect and approve the sending permission. |
| Needs DKIM setup (see below) | The custom address is on a domain that has not been verified yet. Complete the steps in the Email Domain Settings (DKIM) section so your messages do not land in spam. |
A mailbox that is not working never blocks your messages. Apptoto sends them from reminders@apptoto.com instead until you reconnect it. To stop using a mailbox entirely, click Disconnect.
Calendar-Specific Sending
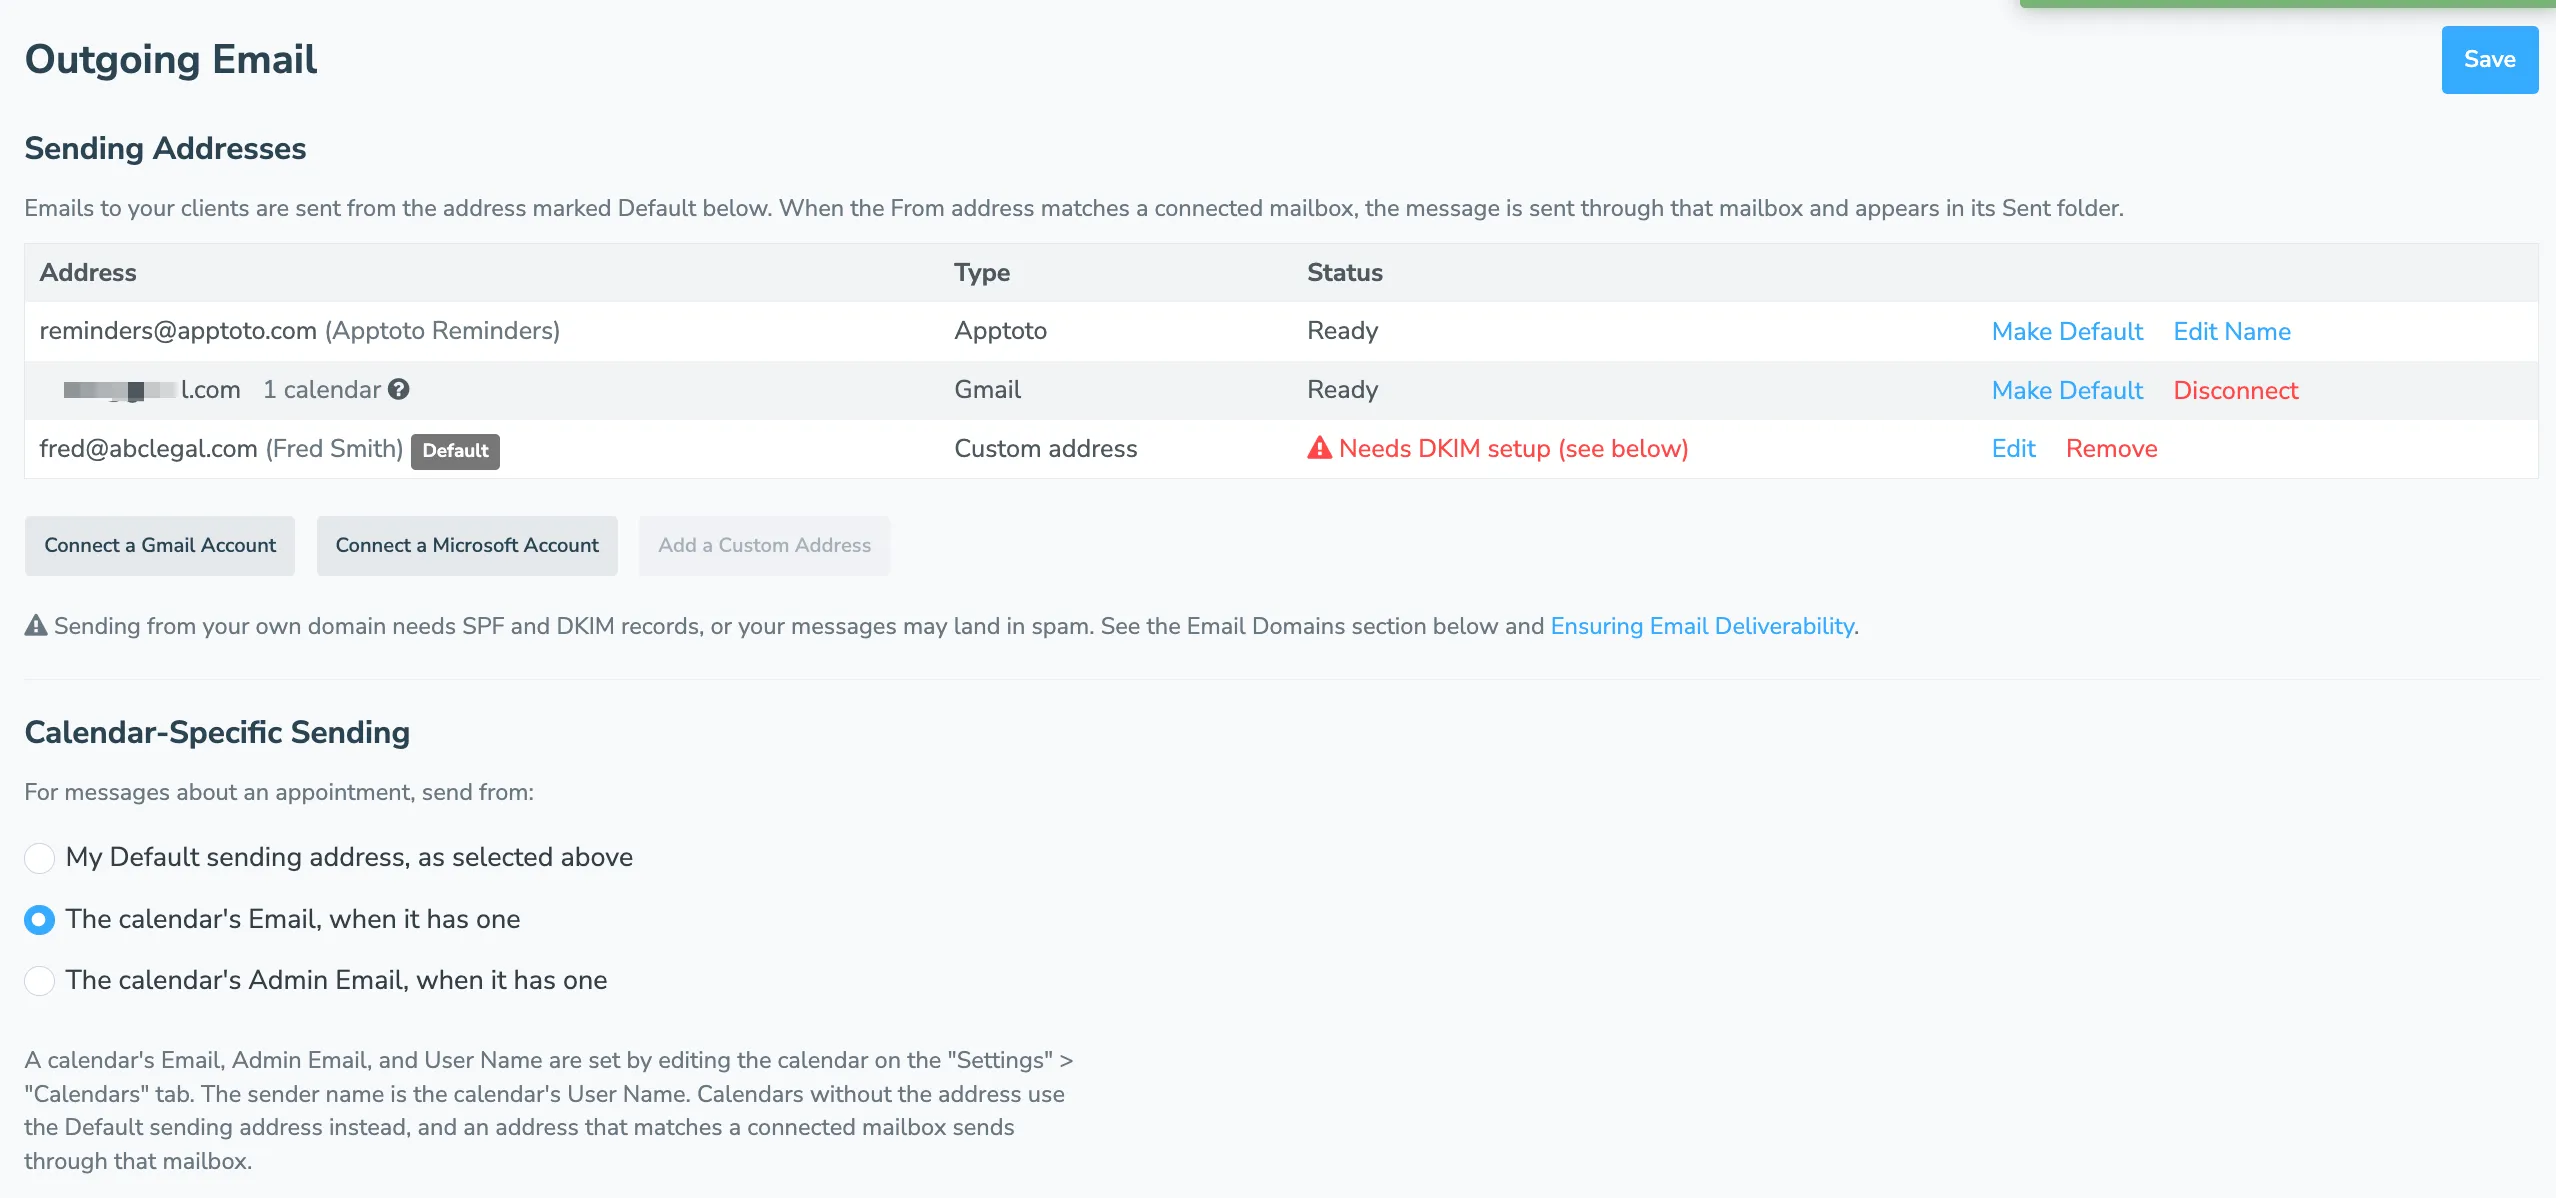
Section titled “Calendar-Specific Sending”By default, every appointment message is sent from your Default sending address. If different calendars belong to different people, you can send each calendar’s messages from that calendar’s own address instead. For messages about an appointment, choose to send from:
- My Default sending address, as selected above (the default)
- The calendar’s Email, when it has one
- The calendar’s Admin Email, when it has one
A calendar’s Email, Admin Email, and User Name are set by editing the calendar on the Settings > Calendars tab. The sender name on these messages is the calendar’s User Name. Calendars that do not have the chosen address filled in simply use the Default sending address.
When you pick one of the calendar options, the Sending Addresses table shows a calendar count next to each address that one or more calendars will send from. Hover over the icon beside the count to see which calendars they are.
To have each calendar’s messages land in its owner’s Sent folder, combine this with connected mailboxes:
- On Settings > Calendars, set each calendar’s Email to its owner’s address.
- Connect each of those mailboxes on Settings > Outgoing Email.
- Choose The calendar’s Email, when it has one under Calendar-Specific Sending, and click Save.
The address has to match a connected mailbox exactly. If any calendar’s address has no matching mailbox, Apptoto lists it in a note under the setting; those messages are still delivered, sent by Apptoto from the calendar’s address (which may need SPF and DKIM setup).
Replies and Copies
Section titled “Replies and Copies”- Let Apptoto handle email replies: when checked, replies to your messages come back into your Apptoto Inbox instead of going straight to the sending mailbox. This works the same no matter which sending address a message went out from.
- BCC Email Address: receive a copy of each message Apptoto sends to your clients. Separate multiple addresses with commas or semicolons.
Tracking
Section titled “Tracking”Check Track when clients open your emails to see opens in Apptoto. See Tracking Email Opens for details.
Email Domain Settings (DKIM)
Section titled “Email Domain Settings (DKIM)”The bottom of the tab is where you add and verify the domains you send from, so mail from a custom address or a calendar address on your own domain stays out of spam. Ensuring Email Deliverability walks through the whole process.